MAIN MIRROR
=============================
The main mirror is the most important part of
your telescope, and what size you chose is not nessasarily important;
than what you intend to use it for. The magnification of the
main mirror is more important when attempting to view bright
nearby objects, and a larger mirror will increase your chances
to see a less visible image or very faint object.
The "X" or "Power" of
a telescope is determined by dividing the distance of the image
and the focal point to which it will be viewed. For instance
I have a 48mm focal point main mirror at 7x magnification, with
a 3.5mm focal point eyepiece at a magnification of 25x. With
all that said, it comes to more than 250x of power.
For determining the "power"
you can use one of the formulas below:
eyepiece focal length = telescope
focal length / max magnification
or
magnification = telescope focal length
/ eyepiece focal length
or
As a more simpler way to determine the max power
of magnification to use for your reflected image on the Secondary
mirror image, you can just double the diameter of the aperature
or (opening) of the scope in Millimeters, and this will give
you a basic guide to choosing your best eyepiece. (ex: this scope
has a diameter of 70mm, so i used 140mm eyepiece.
If you deside on building the 8" Main
mirror version, then the math is 200mm x 2 or 400x power for
the max magnification you should use for an eyepiece. Although
there are not too many eyepieces out there in this size; you
can use some Microscope lenses.
So you see why a larger mirror is the only
way you'll get 300+ power
magnification for superior images on any telescope.
With an 8" mirror you will most likely
see the bands of Jupiter, even maybe a few of it's moons. This
scope was built using a very nice made 3" or 70mm mirror
I found on sale at my local Walgreens, for under $10 (7.99) and
build on that. If you use this, you can see some the best images
of our moon compared to others out there.
If you really have the money; then I suggest
you look into the purchase of some of the better "flawless"
mirrors that will yield a quality image to rival the scopes that
cost $300-$500 dollars. These mirrors are mostly found at more
expensive department stores and cosmetic specialty shoppes located
in your local Mall.
These mirrors are almost perfect in design
and silver quality. Also, they don't come cheap, they can be
VERY costly and will set you back about $50-$200 dollars depending
on the size you want. (3"=$40, 8"=$80, 12"=$100+).
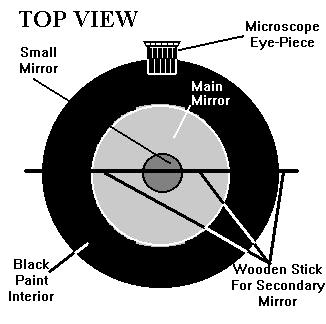
 SECONDARY MIRROR
=============================
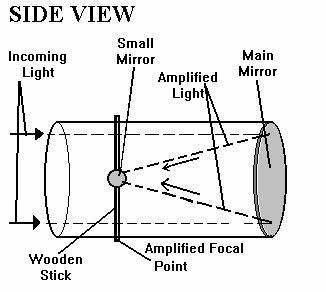
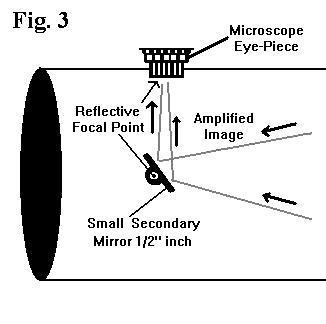
The Secondary mirror is about 1/2" (one
half inch) round and is mounted on a wooden Skewer stick, and
glued in possition at the right angle. Its job is to reflect
the image to the eyepice or camera from the center of the tube
at a 45'-90'
degree angle. I used a hot-glue gun to mount everything.
(See Fig. 3 for a more detailed view.)
Mounted on a wooden Skewer stick, the mirror
can be made by sanding or cutting it from a larger or even broken
piece of mirror. I used a broken piece of mirror with a High-Speed
sander to get it to the right size.
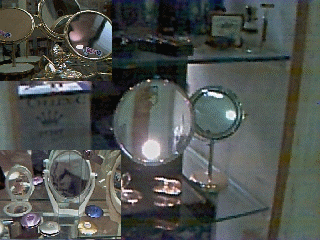
If you make the 8" version; then all
you need to use for the second mirror is a small makeup mirror
or one that is no larger than 1/4.th or 1/3.rd of the opening
or main mirror's size. About 2" inches for the secondary
mirror if you are using an 8" inch main mirror.
(see FIG. 3 below to understand its possition)
Remeber, the more light from the object you
are trying to view that gets to the main mirror; it will be brighter
and have a better chance to be seen.
HOUSING
============================
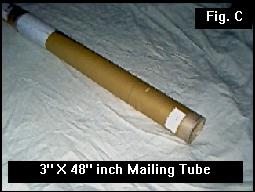
The housing of this 3"(7x) mirror is a 3"
inch round "Mailing Tube" found at a local Office/Bussiness
supply store for $4.95 plus tax, but I got it from my local shopping
mall as a "trow-away" and it is about 36" inches
longer than I need. If you look around there are plenty of places
where you might find the Telescope-Tube of your dreams.
Try checking at your local Mall or department
store for their help, and ask them if they have any old "banner
tubes" or "mail tubes" that they use for thier
display signs or "SALE" signs for hanging in thier
store-front windows or whatever.
Tell them you'll be back to take it off their hands before they
throw it away, or maybe give you a call to when they get one.
Some of these tubes can be as large as 6" inches round and
over 48"inches long.
Other places to to look; your local carpet
wharehouse dealer or flooring store. Carpet tubes can be very
heavy and LARGE. The diameter of these tubes can be 12"
round and over 6 feet long, plus they are almost an inch thick!
To cut these larger tubes requires a good sharp saw but they
make the best scopes.
The inside of the tube; whatever you found,
needs to be lightly sanded and painted with FLAT BLACK paint.
Non-glare or any "no shine" is needed for the interior.
You do not want any 'shine' inside, and a flat-black (oil or
water based) for best performance.
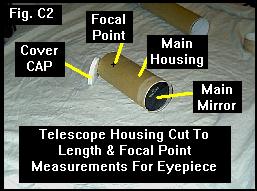
The Length of the housing again is determined by the
"Focal Length" plus a little bit more.
Cut your tube with room-to-spare, and make
it extra long. The extra length will help to balance it all on
a tripod, or even give you ample space to mount the eyepiece.
To know the Focal Length; you will have to
hold the Main Mirror in one hand so that you see a light bulb
or other light source "reflection" on a piece of paper,
and measure the distance between the two. (You should see a perfect
copy of the light on the paper; this is your "focal point")
The distance you get for the image reflection
should be measurred in "cm" (centimeters), this will
give you a more accurate design. Write down the distance on a
piece of paper, and make the hole for the Eyepiece or CAM near
the 'exact' point of focus.
Your best bet is to have the eyepiece mount
as another "small tube" or casing. This way you'll
be able to change focal point (up or down) for use with your
Micro-CAM.
|