 In The Bedbug War; This Is My Weapon Of Choice!
Tourists and travelers stop at the Big Apple by the millions
every year, and now NY has an epidemic on their hands. Everybody
i know has heard of the bedbug problems hitting the northeast
(mainly New York). The problem isn't just there, but nearly one
half the country. Anybody who has a tourist or vacation spot
is open to these pesky blood suckers. They are in the "flea
& tick" family, and are NOT common to the US. They are
most prevalent in Europe and the Eastern countries. They came
here in duffel-bags, travel cases, and even luggage.
Before WWII (world war 2) the United States had NO bug problems,
and was considered to be the cleanest living anywhere on the
planet. Well, maybe not the cleanest, but certainly the best
place for no bedbugs! After WWII, the US government banned the
use of DDT (dichlorodiphenyltrichloroethane), and ever since
then, the US people have had to rely on bug control companies
and other people that placed a required license and or permit
to use pesticides.
We have the US government to blame for this and the corruption
of some pest control companies. Licensing and permits are the
only way you can get some of the chemicals needed to battle these
bugs; and especially in some states like NY.
In some states, there are few restrictions on the chemicals
needed to kill these nasty suckers. The desert Southwest (where
i'm at) has never seen a bedbug, and the words just seem to be
from some sort of 'bed-story' that our mothers told us to keep
us happy..."don't let the bed bugs bite!". The only
thing i ever heard of was; fleas (but we don't have any, or at
least i never seen one), and of course ticks, (we have 'tree-ticks'
they suck sap from baby trees).
I never thought i would go looking for bug-spray other than
the average "raid" or whatever, and found that bedbugs
are rare to the West (let alone the US) and the chemicals needed
to kill them ARE available in Nevada. Some of these chemicals
can be found everywhere. For example, my local Walmart has (3)
different places within the store to obtain a selection of pesticides
and chemicals needed to tackle the bedbug problem.
* Pet Supplies - I found several different selections for
killing fleas and ticks. From Sprays to Powders. ie.. Hartz Flea
& Tick Carpet Powder was the best bet if you wanted a powder
or pet-bed spray that wont hurt anybody. NOTE: the max percent
of pyrethrins in the pet and carpet powder was only 0.075% (seven
hundredths of a percent) which ain't much, but enough to kill
bedbug's eggs and larvae. (pets are one of the leading carriers
of these excellent 'hitchhikers')
* House and Supplies - at this part of the store i found the
Raid flea and tick bombs, and even bedbug bombs and sprays. The
best boom for your buck is the "Fumigator" which uses
a 'smoke' to disperse the chemicals (much like a spray/fogger
but it uses smoke). The fumigator is the most powerful delivery
system for mass areas (about 12%), and is nearly dangerous and
requires the user to put the whole thing in a bowl of water before
you ignite it, plus it leaves a residue that may harm pets and
kids if ingested (read the instructions carefully!)
* Lawn & Garden center - this part of the store was the
best...it had all the high-end chemicals in concentrate (Pemethrins/Pyrethrins
2-3%) for the battle because, you get the chance to make the
mixture yourself...the concentrate i found for my home was; Ortho,
and it contained almost 3% pemethrins (which is actually 65%
chemical and 35% ionic solution). Basically, you only need 1%
of Pemethrins to treat a home or small garden.
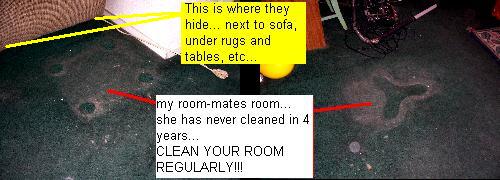
For safe indoor extermination of these things, some are using
(Pyganic Dust) powered, or finely crushed seashells which is
like fine glass. (it cuts into them as they move across it).
It seems though; there is nothing better than the lawn/yard sprayer
concentrate. You don't have to have a yard or lawn to use the
stuff, just mix 1 cup (or atleast 6oz.) to a Gallon of water,
for a strong 'get started' solution.
Get a GOOD spray bottle, or a 'hudson' sprayer (the big canister
lookin kind that you _pump_ up and can walk around with...like
professionals use). The concentrate mixture can be reduced after
a few weeks to about 12 to 1 (twelve parts water to one part
of chemicals...or about 1/2 a cup of concentrate to a gallon
of water).
You'll need to extend your monthly budget for these chemicals
and should be prepared for 10-12 weeks of treatments, increased
laundry, and regular cleaning for atleast 2 or 3 months. Daily
vacuuming and cleaning is good but it doesn't give the powder
a chance to work. Just clean your living areas and bedrooms 2
or three times a week, and spraying Alcohol (91%) all over the
pet-bed and their laying area (couches and chairs as well) will
be your best bet to get a good start. It seems Alcohol and Flea/Tick
powder is what should be used for lasting action (the alcohol
kills them on contact). The Flea & Tick powder should be
used everywhere, and it works best if you leave on the rugs for
days before vacuuming it up.
Empty your vacuum cleaner or bags after every cleaning, and
be sure to wash your hands often when treating areas with these
chemicals. Most pets and kids are safe from the powder, and there
is no heavy odors like other bug sprays we all know use (ie.
Raid.etc.)
(actually; some fresh scent like 'flowers' is always added to
the rug powder)
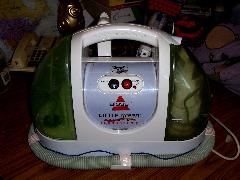
This next part of this story is the 'refurbishment' of my
Bissell Little Green - Pro Heat steam cleaner. It was purchased
several years ago when it first came out, and has been my best
friend for some time now... The unit has a few drawbacks; it
leaks (alot) and the 'flash heater' plus the pump gets clogged
after several uses from using tap water instead of filtered or
purified water.
I have modified my Bissell Little Green with a On/Off spray
trigger, and an improved 'turbo brush' washer. The first part
of this mod is the trigger, and last part of the mod is for the
turbo brush. I also address some of the things I found along
the way. Also included is the wiring diagram, but since i changed
a few things on mine, i made it the best i could remember. (i
replaced the 200v Rectifier with a plug-in-the wall 10vdc Charger
on mine).
You can download the whole project here (download
area) or just keep reading...
Refurbishing The Bissell Little Green
With Pro Heat
The first thing you need to do is disconnect the power and
empty or all water/solution and waste. Don't throw out any solution
(if any) you'll need it later.
Second, get a phillips screwdriver and a pair of needle nose
pliers. You'll have to put the unit on its side (lay it down)
to get to the leaking issue. Remove all the screws on the bottom-plate.
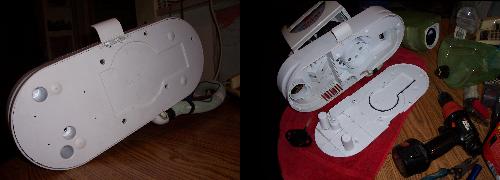
After removing the screws from the bottom area, you'll notice
it just drops flat to reveal a large flat (thin) gasket that
needs to be flush with the housing. The gasket provides the vacuum
to the waste tank, and it should be cleaned and put back just
the way you see it here.
With the bottom removed we can get to the clean water/solution
leak problem. The clean water tank (and pump) require an 'airtight'
seal for it work good (or spray good). Here you can see the hose
replacement I made. (its actually is a peice of 'shrink tubing'
for wires because thats all i had). You might be able to find
the size of hose at your local fish/pet supply store, but you'll
have to buy atleast a foot of it. (we only need about 2 inches)
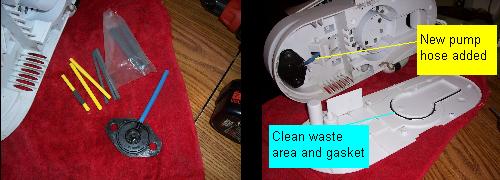
Once you examine the fittings for 'possible' leaks, make sure
the new or old hose is in good condition and not cracked, split,
or ripped anywhere. They used regular 'zip-ties'for the hose's
clamps, and you might want to do the same or use something from
the fish/pet supply store for hose clamps. Make sure everything
is clean around the waste vacuum area, and that the thin rubber
seal is fairly seated correctly. You can use a little WD40 on
your rubber or use a light grease like Vaseline when you are
ready to close it up. Don't close it up until you have made sure
the clean water pump hose is finished or in good shape.
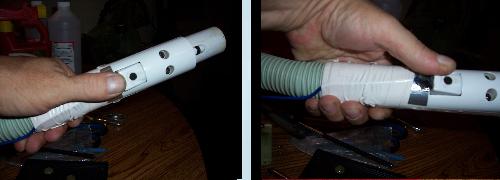
Next part details some of the changes i made to the trigger.
Here you can see i put a small push-ON switch (normally open)
inside the area where the original hose valve was. The switch
is wired to the pump which allows me to control the pump spray.
This also should extend the life of the pump, and should not
have to work so hard. I also had to remove the entire hose valve
assembly in the handle in order to get the switch to fit. then
cover the switch entirely in silicon.
While inside the handle, check the hose there, because it
too leaks badly. Check the clean water hose at this end for breaks
or rips or tears. If you must; cut a little off the end to make
a new fitting, and add a new zip-tie or clamp to fix it. If your
hose here is NOT damaged but just 'crimped' from being not used
for a period of time, then it should be good to go. (i had to
remove everything, the crimp was just too bad).
Wire your switch with a mini line of 2-wire leads, and run
it down the length of the hose to the inside pump. There you
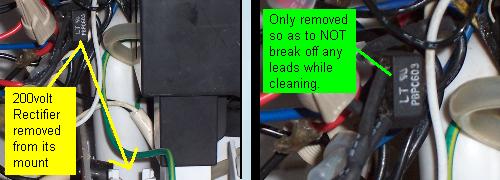
can tap into the '+' (red) wire that goes to the pump. The pump
is 12volts DC 3.A, and its power comes a 200volt Bridge Rectifier
located on the inside area between the AC vacuum blower and the
heater/pump assembly.
You will have to unscrew the rectifier from its mount one
screw in the middle holds it in place. (If you don't you might
break a wire lead while working on the heater or just moving
wires around). Make sure you have the unit unplugged at this
point, and then give everything a good cleaning.
I had to replace the pump motor just after 1-2 years of service
because of a rusted shaft, and Calcium and Alkali buildup in
the pump housing. I cleared the buildup in the pump housing,
and the pump motor i found came from an old 'electric broom'
(9volts). It was a perfect fit, but it is a 10vdc, and using
the 12volts from the rectifier was too much...so i added a 10vdc
2.Amp power transformer to the machine in place of the rectifier
diode. The LED Ready light works the same, its just abit dimmer.

With the added switch and the replacement hose, all that has
to be done now is check the heater and the rest of the rubber
stuff found elsewhere on the machine. I found that there are
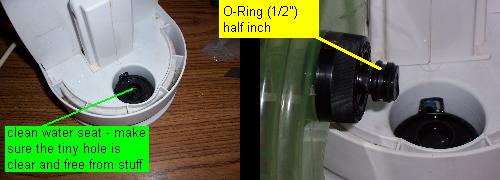
several 'o-ring' washers used that might be the cause of leaks.
Here you can see the handle's washers (2) 1/8th-1/16th O-rings,
and (1) 1/2 inch on the clean water tank.
These are good to go on mine, but some may want to replace those
on the handle to stop the leak.
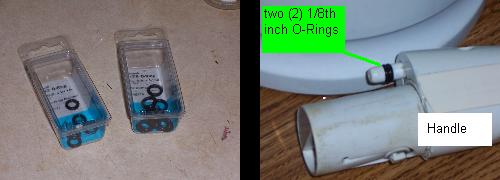
I found a variety of O-Rings at my local hardware store, and
bought some just incase i need them later(1/8th to 1/2"inch).
If you get the chance; do the same. If you can't afford it right
now, just use some vaseline on the old ones...it should help.
Notice the clamps installed on the hose(s) coming from, and
going to, the heater box. These hoses should be clean and cleared.
You can use the needle nose pliers on these clamps, and remove
them, just make sure they are put back 'on' the hose before you
close it back up.
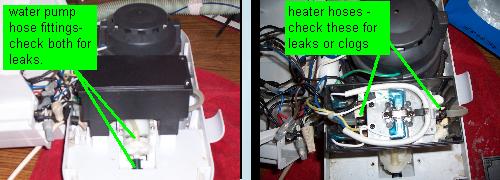
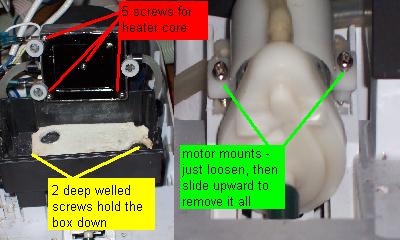
Here you can see the heater and pump assembly, remove the
screws at the top of the black box, then inside, and down' you'll
find 1 screw on each side. Only 2 screws hold the heater box
down (on top of the water pump). These screws need to be removed
if you intend to replace or fix the water pump. After you have
the heater assembly removed, check for leaks again at the hose
ends. To replace the water pump, just loosen the 2 screws at
either side of the motor (they don't have to be removed, just
backed-off enough to 'slide up' the motor housing and pop it
out. (thats why we had to remove the heater assembly)
If you need to clean everything from using ordinary tap water,
just use a solution of 50% vinegar and water, and let it sit
for a few hours. If that don't work try soaking it in a mild
solution of CLR (calcium, lime, rust) remover. The heater I'm
afraid requires a bit more.
For cleaning the heater; remove the screws located underneath
(5), and be careful not tear or stretch the gasket inside while
separating the cover. I mine, i found that the water damaged
a spot in the corner of the cover-plate, and i had to solder
it. Using ordinary 'tap water' is truly the worst thing for this
machine. If you can; only use purified or at least filtered water.
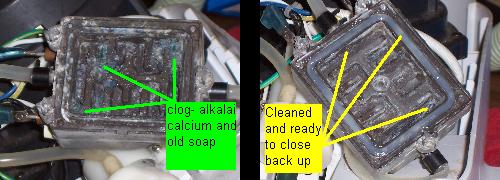
Looking inside the heater; you can see the build-up of alkali,
calcium, and old soap. This is only from a couple uses and then
stored for a few months. The build-up is a total 'clog' and no
water can move through the heater until it is cleaned. I use
a little CLR here, and then some 'fine' 400 sandpaper to touch
up the grooves where the gasket fits.
After cleaning the heater (and cover), i mounted the gasket
and coated everything in a thin layer of Vaseline or grease.
I put the hose clamps on and closed it up.Next, after you fit
everything back into place (wires and rectifier) and double check
everything. Close it back-up and make sure you don't 'crimp'
any wires or hoses during the process.
Then make sure you greased all the rubber (the waste tank,
the waste tank's seat where you put it down on the machine) and
the clean tank and it's seat where it fits into the machine.
Also note that; in order to get the pump working right you are
gonna have to 'prime' it. That means sometimes letting it run
until it catches water instead of 'air', or you can suck the
air out of the line from the handle's end (much like siphoning
gas from car's tank) but thats pretty hard even if you do have
supper lungs and magical lips.
When its time to refill the clean water tank, make sure you
have left over water already in the tank's seat area, and that
it is full and no air in the line so you don't loose your siphon
power. (whatever you do; don't hit the trigger until you have
a fresh tank of water back in its place)... Here (fig. ) shows
the water is almost like a little water bubble. If you do this
right, your sprayer will work all the time you the trigger.
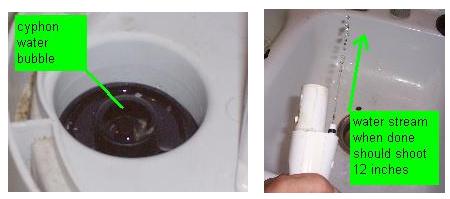
Once you have closed it up; turn it on and test it. You should
have steady stream (about 12"inches) shooting out the handle
when no brush is attached. There seems to be no problems with
it when its working right, and sometimes all you need to fix
it when it stops spraying is; a small thin wire to clear the
tiny little spray hole located on the brushes. (i use a section
of guitar string, or a new lead from a diode or resistor to clear
the obstruction in the hole Or you could use a blast of air if
you got it.)
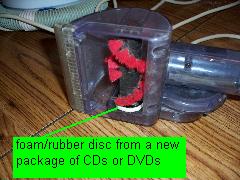
The turbo brush mod is just a fix. I used the white little
rubber/foam disc i get when i open a new package of blank discs
(CDs or DVDs). The turbo brush i have had a little air leak around
the brush shaft. All i had to do to use the new foam/rubber seal,
was to trim a little off the edges before i remounted the brush
bar. Now it has a good seal, and the turbo part works great!
That's It! Good Luck!
-CopyCat '10