|
Multimedia & Software
|
|
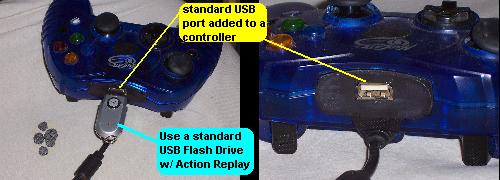
 This is another 'u-can fix-it" title. It shows you the most common failures to the classic XBOX and what you can do to getting it up and running again or just keep it clean and working. Loaded with photos, and details, plus info on modifying or hacking the XBOX so it can do alot more than just play a few games. (NOTE: A hacked or modified XBOX is not allowed on some gaming sites and is considered cheating) Also, you should not clean any neglected device without protection. Some of the allergens and dust inside this XBOX and other devices like TVs, VCRs, DVD Players, Home Theater and sound equipment and list goes on... Dusting these things indoors can make you sick (like a cold) in just a few days after cleaning; you might experience minor throat or nasal irritations especially from anything that makes or has a magnetic field, high-power, or gives-off alot of heat and was not cleaned or serviced in years. If you are cleaning your XBOX for the first time and want to fix or modify its operating system and maybe add a bigger hard drive (80gb-160gb suggested...shop around!), or get a fancy colored case with lights... check out llamma's website, and Unicron's article on: getting the XBOX HDD Key. (i use his diagram for the interface and cable described later in this guide). Along with Unicron's article and cable, you'll need to download a little file called; "xboxhdm" (xbox hard drive maker) it should be a snap for someone versed in the ways of Linux. If you are new to XBHDM then there is a LONG VERSION or SHORT VERSION help areas on the Web to get you started or un-stuck. (you might find this or another program that lets you 'format' a new hard drive), and hopefully it will use the HDD Key (eeprom.bin) file received using Unicron's method. Your new hard drive (as far as i can tell) can't be over 360GB, and there seems to be a limit on partitions. (i cant seem to get past drive I:) C, D, E, F, G, and H work just fine until i go over 180GB...whats up with that..? Adding a standard USB port to a new or old controller, (preferably one you don't like)...the wiring is very simple and easy. To get the XBOX game hack on the USB drive; you'll have to change a (*.inf) file installed on your Windows system and the way it reads the USB flash drive you want to use as a XBOX Mem Cartridge. XBOX Memory Cartridges are NOT compatible to anything except an XBOX and a PC running AR (action replay)  To make an xbox 'mem save' cartridge; just use an old or new USB FlashDrive, and a modified game controller. I got Action Replay (2003) from CodeJunkies to transfer XBOX game saves, exploits, and help files. In order to use a standard USB flash drive instead of an actual Mem-Card, you will have to know how to install a device driver and have system administrator rights on your PC. You might want to buy the new(er) Action Replay or just download the 3.1 version from CodeJunkies now). In order to modify the the OS (operating system); i used XBINS (xbox binary depository) for the "splinter cell" exploit, and downloaded the 'game save' files onto a flash drive...but your computer has to be fooled into thinking it sees a XBOX Mem Cart instead of a USB flash drive. Just modify the drive (xbreader.inf) file found in the C:/Programs/Datel/Action Replay/Drivers directory. To get a device's ID using windows 98/ME/2000 I use a little program called USB View (http://www.ftdichip.com/Support/Utilities/usbview.zip) to see the Vendor's device ID and Product ID when its plugged into one of my USB ports. USBView shows the old flash drive i want to use on my XBOX as: idVendor: 0x05DC here is the example of the device IDs added to the "xbreader.inf" file.... USB/VID_05DC&PID_A701 Use the ID codes from USBView or any other device info tool, and enter them into the AR's file list of compatible XBOX Mem Cards. Then when you plug in the USB flash drive into your PC; it should load the Action Replay driver instead of using the one in windows. If not, then change the drive's properties and update or change the device driver to the Action Replay driver. Restart your PC then start the Action Replay program again and plug in the flash drive now; then just 'drag and drop' the exploits (LINUX game saves) to the PC Database or Memory Card window. NOTE: ALL FLASH DRIVES WILL BE AUTOMATICALLY ERASED if you plug it into an un-moded (virgin) XBOX!!! Mark your USB flash drives with (PC) and your XBOX flash drives with (XB) and keep them separate! In the image below; I made a render the best i could. You decide on where you'll place your female USB port; i chose the top slot on the controller for my USB port. With my controller below (blue), i had no choice but, to mount the female USB port upside down. Now plug-in the [XB / ActionReplay] FlashDrive and use the MSDashboard (main screen) to navigate in [Memory] and look for the controller # and it will show as "memory unit 1A" (or whatever port its on). Then choose to copy to the HardDrive the game save /"exploit" you'll be using (you must have the exact game to match the crack), then unplug the cart. and run the Official Xbox Game (ie..MechWarrior, SplinterCell, 007) to load the new game saves that will change your xbox forever. THEN later you can just run XBMC and plug in any standard PC flash drive, and you should hear it being mounted, and see the 'mem-unit#" mount display notice. (bottom right corner). If you get no response from the new port on your controller, then reverse the DATA IN and DATA OUT wires. If you still get no response, you might not be using the true ground for the controller. Make sure you don't use the spot next to the GND; it is for the lightgun or some other device and is not needed. 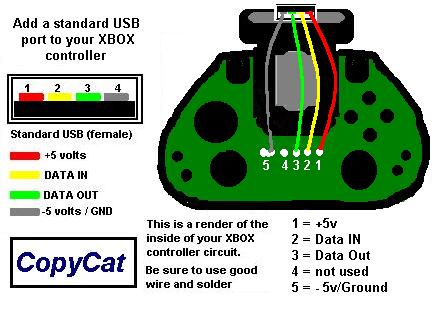 If you are wise in the ways of downloads, then get the last and most stable version of XBMC (xbox media center) v9.0 or 9.1. XBMC is a fantastic build of media proportions. It allows you to use any standard USB Keyboard, Mouse, and of course, a flash drive that you might use with your PC. It also lets you transfer all your media (Movies, Music, Photos, Games, etc.) to your XBOX hard drive with any standard USB Flash Drive and it's built-in file manager. XBMC can also play most of the Web or Net movies already out there, and all MP3 files today. Click Here to get more info on XBMC ver 9.xx (2009 was the last stable version)  The other best place to find the real files you seek is; (XBINS); it might have another version of XBMC (i think the v9 link above is the best bet), so choose your options carefully. As usual, i can't tell you exactly where XBINS is, but the site has more info on how to connect and install the COMmunication software on your PC. Once you have the XBINS client-ware installed; you should be able to navigate your way (or FTP) to the download site and get what you need. After you download the needed files; the only way to get them into your XBOX (before you actually have XBMC installed) is; FTP (file transfer protocol) through the 'back door' using the networking port on the XBOX console or by putting your files on a -R DVD/RW disc then using your dashboard file manager to transfer files.
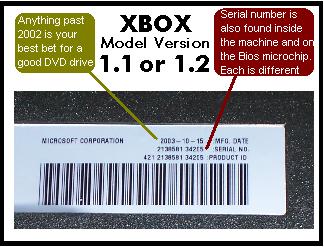
 Some versions (or models) in the beginning of the XBOX line; were lacking honest support and contained poor quality DVD ROM drives, these troublesome drives caused lots of people to turn to the Sony Playstation for a game machine. There are about 5 or 6 versions of xbox models. Before you begin; make sure you don't have the 1.0 version (2001/2002). These models have the Phillips DVD ROM drive which; was not covered in the user's warranty because of all the complaints. Microsoft requested all owners of these units to return them (at the owner's expense) for minor repairs and then charged them for a new drive...(Hittachi or Samsung were most common replacements).
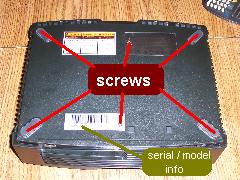
The screws are a 'hex' technician type (about 15 metric for really long bottom screws and 10 metric for the ones inside) and the bottom screws can be modified. I used a Dremel with a 'cutting wheel' to make a _slot_ or groove in the head of the screw. Now i can use a standard screwdriver to remove them. Some screws in the early years were 'black' and not silver. All units have the same tech-type screws inside. 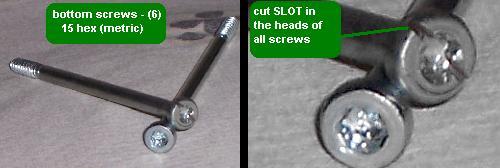
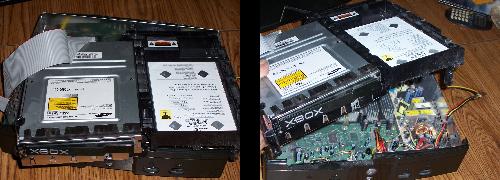
After you have the screws removed, you can lift the cover off. At this point; take it all outside and blast the heck out of it with air. Or you could do it after you removed the DVD and HD drives. You will need to remove the three (3) screws holding the DVD and HDD in their place. The DVD drive is the first to lift, then the HDD and it's tray will lift up and out. 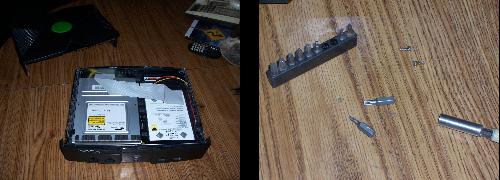 Remember the 'tight fit' here, it will be a little tricky when you are ready to put it back in. The HDD power cord (4colors) fits neatly in a track/rail, and it has to be pulled up and then pushed down to get the slack you'll need to lift the HDD tray up.
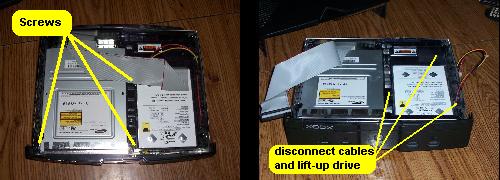 Disconnect the I/O ribbon cable and the power connector on the HDD and DVD drives, and remember exactly how the DVD ribbon is connected to the motherboard...(red stripe on ribbon) and the direction its plugged in. The same goes for the power cords, and the little yellow bundle (or white or whatever color they could be) from the DVD drive. I use a Red or Black marker on my connections just before i remove them to help make it easier later.
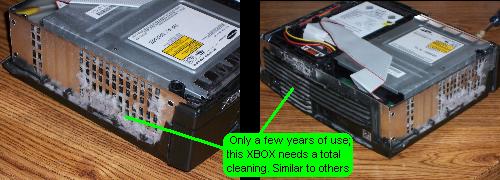 Here you can see the collection of dust, hair, and carpet fluff. Be careful not to disturb the dust until you are ready to take it all outside. This dust and it's germs can make anybody ill in just a few days. (much like a cold) Use a dust mask or something to protect you from breathing this stuff in.
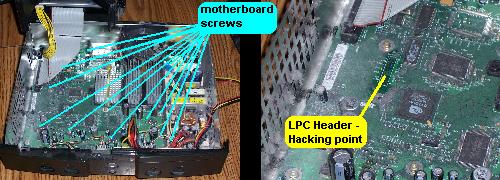
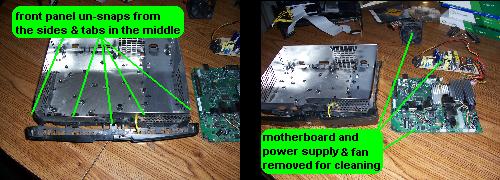
 If you are going to clean the entire xbox or want to put it in a new (custom) case, remove all the motherboard screws (12) and the power supply screws (2). plus, remove the (2) screws holding down the controller port(s). Before you go any further, take it all outside now (if you haven't already).
 Remove the front panel by pulling on the sides, and spreading the side clips, and pull-up on the little tabs located near the bottom of the face; it will then drop-off to reveal the status light and power button. Some 1.0 and 1.1 models suffer from a 'sticking' eject button, and can cause unwanted errors. To fix these, i remove the face, and grease (Vaseline) the button directly. If that don't help, try using a nail-file or emery-board to lightly sand or trim the button housing so it don't stick or touch the button.
 Some XBOXes have been built with a variety of cheap parts, and this 1.1 model shows the main causes of a failure. The capacitor we need to check is located near the front, and is the main power to the controllers and the front panel. If this part is bad, it will look like it 'leaked' or caused damage to the circuit board. It will have to be replaced with a capacitor of the same value (1000uf @5volts). If you have to, you can substitute a capacitor of higher voltage, but the value has to be the same. 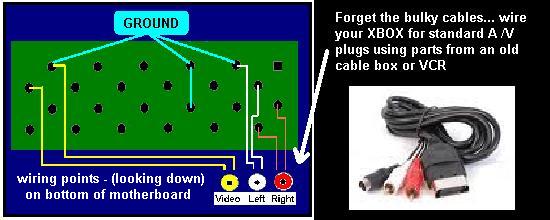 This is also a good time to consider if you want to add lights or even internal A/V ports (as shown at the end of this project) IF you are going to cut any holes; now is the time to do it. (make all cuts as accurate as you can...and take your time, this project is well worth it).  If you are going to hack your XBOX; you should change the HDD (hard drive), you'll have to read the article that Unicron made years ago. His diagram for the cable used and instructions cover all the stuff needed to get the XBOX HDD Key. The XBOX uses a unique set of numbers to identify it's HDD and DVD drives. Every XBOX has it's own key, and no two are alike. If you have to replace the DVD ROM drive, remember YOU CAN use any classic XBOX DVD drive, just unplug the old one and plug-in the new one, no code key is needed, and the XBOX will accept the new or used original DVD drive with no troubles.(as long as its clean and works). 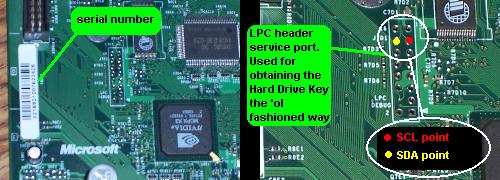 The LPC Header port is located around the same place for all models, in the center and to the left on the motherboard (under the DVD drive). The only model that might be different is the 1.6 and some of the 'prototype' models refurbished just after the first production model was released. These slightly-different models were used as test machines before any were available in stores and have been redone by Microsoft and may contain different controller port arrangements, different video chips, and other things.... (read Unicron's article).  When you are ready to get the HDD Key, make sure that the unit works and is ready to be powered-up. You will have to plug-in the A/V cable before you turn it on. If you don't; the unit will fail it's 'checksum' at startup and flash red. If you use PonyProg2000 or even version 2.7 do a 'double take' when reading your EEPROM and the author suggests you do it a couple times for a better chance to have a good eeprom file. Save the EEPROM reading as "eeprom.bin" in it's own folder, and send a copy to floppy disk. (the 'ol 1.4mb kind) for use later. After you have a copy of the HDD Key saved, you can check it, and make sure its good with a little program downloaded and called "LiveInfo". This program is shareware, and has a time limit of 30 days (i think) before you are asked to buy it. I used it here once to verify a good Key. 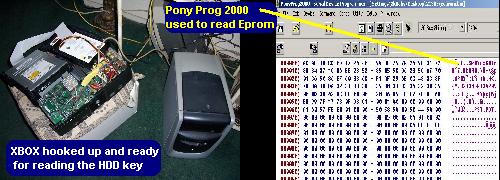 If you are just cleaning the unit to get it working right, then your next step is to clean the DVD ROM drive. Remove the DVD drive from it's holding tray (pops out). Take out the screws that hold the cover down.On some drives they are on the top of the drive, on this one they are on the bottom To get the tray open, just push-in on the emergency eject lever located at the bottom and under the tray door. Some models just have a little hole where the eject lever is, and you'll have to find something to fit in the hole and eject or 'unlock' the tray. 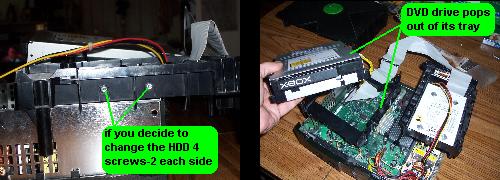 Dirt, dust, and pet hair are the main causes to DVD drive failure. The lens inside the drive can get scratched by all the hair or dirt flying around when playing a game. If the lens is damaged on the DVD drive, you'll have to find a new lens, or get another drive. I found replacement 'pick ups' for the XBOX DVD ROM drives on eBay for about $20 bucks, and there are several to choose from. There are a few good pages out on the Web that show you how to replace the laser lens unit if you have to. 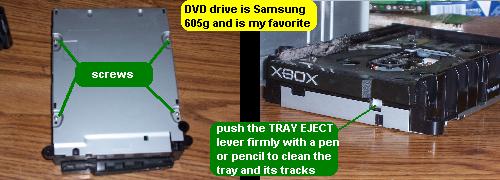 Cleaning the dirt and dust from the DVD drive is easy, just be careful handling the drive when the tray is open; it can break. Also, be sure not to touch the lens or drive wheel with any grease or dirty brush (or fingers). The drive wheel needs to be cleaned with a 'non-shredding' cotton towel, and alcohol (70% or better). If you can use a microscope or magnifier lens to see the condition of the drive wheel and laser pickup lens, then do that first before you do anything. The pickup lens can be touched lightly with a cotton swab (Q-Tip) soaked in alcohol, and a blast of air to clean it. It is VERY sensitive to touch, so avoid touching it if possible and especially after cleaning or putting it back together. |